Difference between revisions of "ProDon:Labels or Envelopes Word 2007"
| (12 intermediate revisions by 3 users not shown) | |||
| Line 1: | Line 1: | ||
| − | {{ | + | {{Header_TOC}}<br> |
| − | |||
| + | <br> | ||
== Introduction == | == Introduction == | ||
| − | This procedure explains the steps to create a labels or envelopes master document. | + | This procedure explains the steps to create a "labels" or "envelopes" master document. |
== Master Document Configuration == | == Master Document Configuration == | ||
| Line 13: | Line 13: | ||
In the "Master document management" window, click on [[Image:Button add plus.png]] button. | In the "Master document management" window, click on [[Image:Button add plus.png]] button. | ||
| − | Name the document. | + | Name the document. |
Choose the "Client" document type, select the language and choose the wanted merge fields. | Choose the "Client" document type, select the language and choose the wanted merge fields. | ||
| Line 19: | Line 19: | ||
When the master document is configured, click on the [[Image:Bouton Ouvrir Editeur.png]] button, then open the document in the editor. | When the master document is configured, click on the [[Image:Bouton Ouvrir Editeur.png]] button, then open the document in the editor. | ||
| − | '''NOTE:''' If the option "Use a document by language" was chosen, a button for each language | + | '''NOTE:''' If the option "Use a document by language" was chosen, a button for each language is available. |
| − | For more information concerning the master document configuration, consult the section | + | For more information concerning the master document configuration, consult the section [[ProDon:Master Document Management#Main_Screen|Master document configuration]] of the "Master document management" procedure. |
== Creating a "Labels" Master Document == | == Creating a "Labels" Master Document == | ||
| Line 39: | Line 39: | ||
<br> | <br> | ||
| − | {| | + | {| cellspacing="1" cellpadding="1" border="1" class="wikitable" style="width: 531px; height: 436px;" |
|- | |- | ||
| colspan="2" | | | colspan="2" | | ||
| Line 66: | Line 66: | ||
{| width="200" cellspacing="1" cellpadding="1" border="1" class="wikitable" | {| width="200" cellspacing="1" cellpadding="1" border="1" class="wikitable" | ||
|- | |- | ||
| − | | <br> | + | | [[Image:Labels or envelopes Word 2007 003.png]]<br> |
|- | |- | ||
| | | | ||
| Line 102: | Line 102: | ||
<br> | <br> | ||
| − | {| | + | {| cellspacing="1" cellpadding="1" border="1" class="wikitable" style="width: 572px; height: 503px;" |
|- | |- | ||
| colspan="2" | [[Image:Labels or envelopes Word 2007 005.png]] | | colspan="2" | [[Image:Labels or envelopes Word 2007 005.png]] | ||
| Line 129: | Line 129: | ||
== Creating an "Envelope" Master Document == | == Creating an "Envelope" Master Document == | ||
| − | {| cellspacing="1" cellpadding="1" border="1" style="width: 486px; height: 433px; | + | {| cellspacing="1" cellpadding="1" border="1" class="wikitable" style="width: 486px; height: 433px;" |
|- | |- | ||
| colspan="2" | [[Image:Labels or envelopes Word 2007 007.png]]<br> | | colspan="2" | [[Image:Labels or envelopes Word 2007 007.png]]<br> | ||
| Line 143: | Line 143: | ||
<br> | <br> | ||
| − | {| cellspacing="1" cellpadding="1" border="1" style="width: 346px; height: 506px; | + | {| cellspacing="1" cellpadding="1" border="1" class="wikitable" style="width: 346px; height: 506px;" |
|- | |- | ||
| colspan="2" | | | colspan="2" | | ||
| Line 159: | Line 159: | ||
|- | |- | ||
| width="50%" | | | width="50%" | | ||
| − | '''<span style="color: rgb(255, 0, 0);">E: </span>'''When the | + | '''<span style="color: rgb(255, 0, 0);">E: </span>'''When the envelope format is selected, click on "OK". |
| width="50%" | <br> | | width="50%" | <br> | ||
| Line 168: | Line 168: | ||
{| width="200" cellspacing="1" cellpadding="1" border="1" class="wikitable" | {| width="200" cellspacing="1" cellpadding="1" border="1" class="wikitable" | ||
|- | |- | ||
| − | | <br> | + | | [[Image:Labels or envelopes Word 2007 003.png]]<br> |
|- | |- | ||
| | | | ||
| Line 179: | Line 179: | ||
<br> | <br> | ||
| − | {| cellspacing="1" cellpadding="1" border="1" style="width: 286px; height: 412px; | + | {| cellspacing="1" cellpadding="1" border="1" class="wikitable" style="width: 286px; height: 412px;" |
|- | |- | ||
| colspan="2" | | | colspan="2" | | ||
| Line 191: | Line 191: | ||
| width="50%" | | | width="50%" | | ||
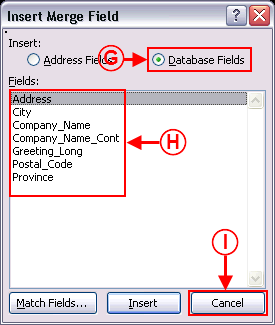
| − | '''<span style="color: rgb(255, 0, 0);">I: | + | '''<span style="color: rgb(255, 0, 0);">I: </span>'''Choose the fields to insert on the envelope. To do so, double-click on each field to insert or select the field, then click on "Insert". |
|- | |- | ||
| width="50%" | | | width="50%" | | ||
| − | '''<span style="color: rgb(255, 0, 0);">J: | + | '''<span style="color: rgb(255, 0, 0);">J: </span>'''When all the fields have been selected, click on "Cancel". |
| width="50%" | | | width="50%" | | ||
| Line 230: | Line 230: | ||
<br> | <br> | ||
| − | {{Footer_ProDon}} | + | {{Footer_ProDon}}<br> |
Latest revision as of 07:41, 5 May 2016
| Labels or Envelopes Word 2007 |
Introduction
This procedure explains the steps to create a "labels" or "envelopes" master document.
Master Document Configuration
From the software home page, click on the "Mailings" menu, then select "Master documents".
In the "Master document management" window, click on ![]() button.
button.
Name the document.
Choose the "Client" document type, select the language and choose the wanted merge fields.
When the master document is configured, click on the ![]() button, then open the document in the editor.
button, then open the document in the editor.
NOTE: If the option "Use a document by language" was chosen, a button for each language is available.
For more information concerning the master document configuration, consult the section Master document configuration of the "Master document management" procedure.
Creating a "Labels" Master Document
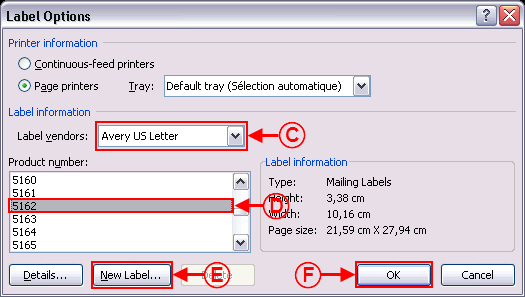
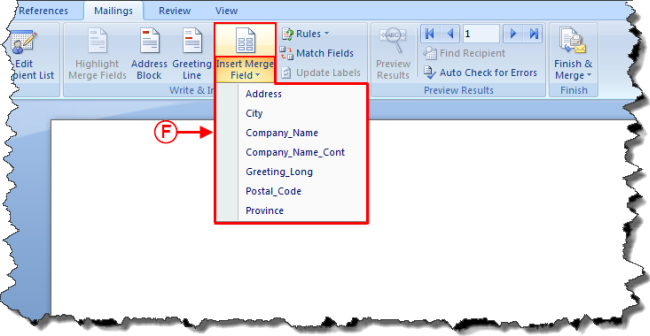
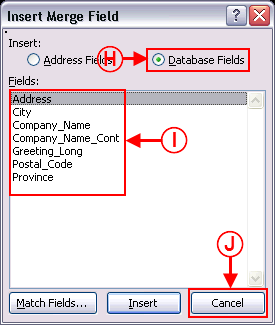
| |
|
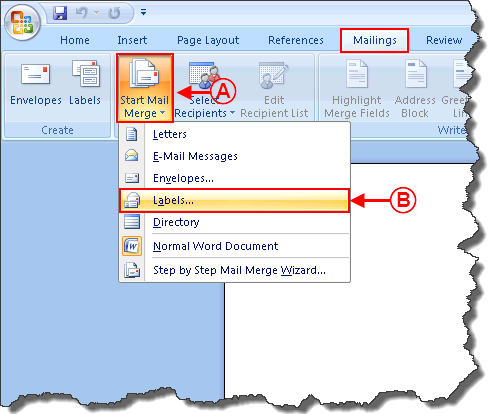
A: In the "Mailings" tab of the Word editor, click on "Start Mail Merge". |
B: Select the option "Labels". |
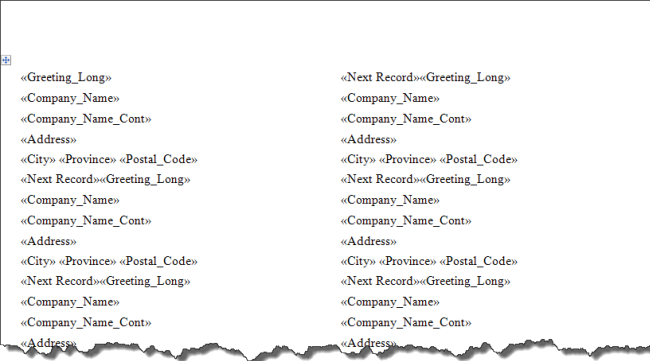
| |
|
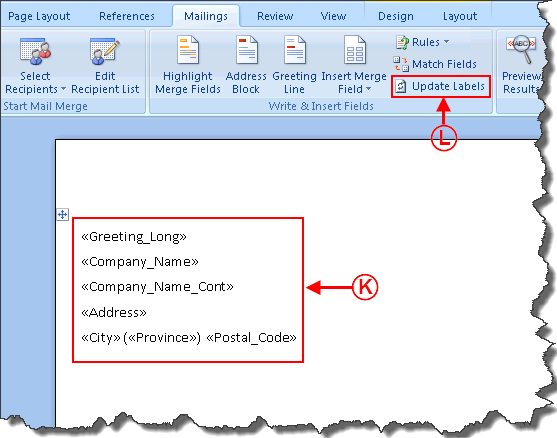
K: Format the fields (add spaces, "Enter", parentheses, etc. in between the fields). |
L: Click on the "Update Labels" button to insert the merge fields on all the labels. |
Creating an "Envelope" Master Document
 | |
|
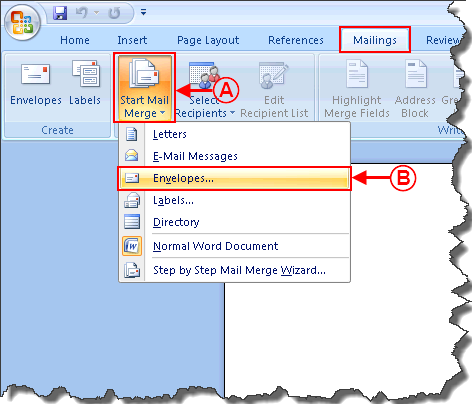
A: In the "Mailings" tab of the Word editor, click on "Start Mail Merge". |
B: Select the option "Envelopes". |
|
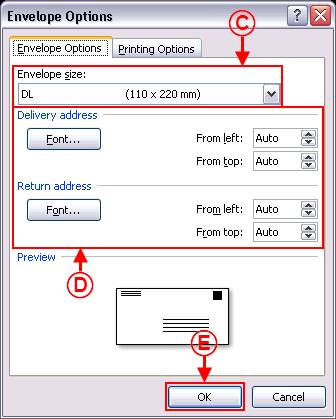
This window opens. | |
| |
|
C: Select the envelope format. |
D: Define the wanted font options. |
|
E: When the envelope format is selected, click on "OK". |
|
|
|
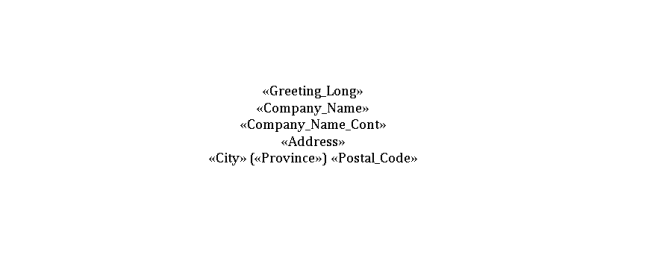
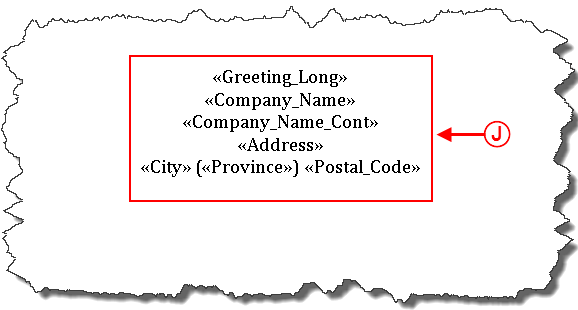
J: Format the fields (add spaces, "Enter", parentheses, etc. in between the fields). |
Document name: ProDon:Labels or Envelopes Word 2007
