Difference between revisions of "ProDon:Integrating a Word Document in the Database"
| (3 intermediate revisions by one other user not shown) | |||
| Line 1: | Line 1: | ||
| − | {{ | + | {{Header_TOC}}<br> |
<br> | <br> | ||
| Line 13: | Line 13: | ||
The "Master document management" window will open, click on [[Image:Button add plus.png]]. | The "Master document management" window will open, click on [[Image:Button add plus.png]]. | ||
| − | {| | + | {| width="200" cellspacing="1" cellpadding="1" border="1" class="wikitable" |
|- | |- | ||
| | | | ||
| Line 32: | Line 32: | ||
<br> | <br> | ||
| − | {| | + | {| width="200" cellspacing="1" cellpadding="1" border="1" class="wikitable" |
|- | |- | ||
| | | | ||
| Line 51: | Line 51: | ||
== Obtaining the Location of a Master Document == | == Obtaining the Location of a Master Document == | ||
| − | {| | + | {| cellspacing="1" cellpadding="1" border="1" class="wikitable" style="width: 265px; height: 297px;" |
|- | |- | ||
| colspan="2" | [[Image:Int. Word doc. in database 003.png]] | | colspan="2" | [[Image:Int. Word doc. in database 003.png]] | ||
| Line 65: | Line 65: | ||
<br> | <br> | ||
| − | {| | + | {| cellspacing="1" cellpadding="1" border="1" class="wikitable" style="width: 375px; height: 575px;" |
|- | |- | ||
| colspan="2" | | | colspan="2" | | ||
| Line 87: | Line 87: | ||
"Save as" the document. | "Save as" the document. | ||
| − | {| width=" | + | {| width="635" cellspacing="1" cellpadding="1" border="1" class="wikitable" |
|- | |- | ||
| colspan="2" | [[Image:Int. Word doc. in database 005.png]]<br> | | colspan="2" | [[Image:Int. Word doc. in database 005.png]]<br> | ||
| Line 99: | Line 99: | ||
|- | |- | ||
| width="50%" colspan="2" | | | width="50%" colspan="2" | | ||
| − | '''CAUTION: '''Do not use extension ".docx" of '''''Word''''' ('''''Word''''' 2003 or older versions). | + | '''CAUTION: '''Do not use extension ".docx" of '''''Word''''' ('''''Word''''' 2003 or older versions). |
|} | |} | ||
| Line 105: | Line 105: | ||
<br> | <br> | ||
| − | Close the '''''Word''''' document. | + | Close the '''''Word''''' document. |
== Opening the Master Document from the Software == | == Opening the Master Document from the Software == | ||
| Line 113: | Line 113: | ||
Go in the "Master document management" by clicking on the "Mailings" menu, then click on "[[Image:Bouton document maître.png]] Master documents". | Go in the "Master document management" by clicking on the "Mailings" menu, then click on "[[Image:Bouton document maître.png]] Master documents". | ||
| − | {| | + | {| cellspacing="1" cellpadding="1" border="1" class="wikitable" style="width: 535px; height: 498px;" |
|- | |- | ||
| colspan="2" | [[Image:Int. Word doc. in database 006.png]] | | colspan="2" | [[Image:Int. Word doc. in database 006.png]] | ||
| Line 127: | Line 127: | ||
<br> | <br> | ||
| − | {| | + | {| width="200" cellspacing="1" cellpadding="1" border="1" class="wikitable" |
|- | |- | ||
| | | | ||
| Line 144: | Line 144: | ||
When the fields are inserted and the document is complete, save it using the "Save" function. The database will always keep the same document name and the same location. '''NEVER USE THE "Save as" FUNCTION.''' | When the fields are inserted and the document is complete, save it using the "Save" function. The database will always keep the same document name and the same location. '''NEVER USE THE "Save as" FUNCTION.''' | ||
| − | {{ | + | {{Footer_ProDon_Version|4.6.5.7}}<br> |
Latest revision as of 08:40, 5 May 2016
| Integrating a Word Document in the Database |
Introduction
It is possible to integrate an existing Word document as master document in the software.
Creating a Master Document in the Database
From the software home page, click on the "Mailings" menu, then select "![]() Master documents".
Master documents".
The "Master document management" window will open, click on ![]() .
.
|
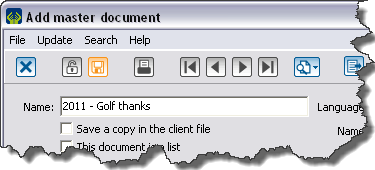
The "Add master document" window opens. |
|
|
To configure a master document, follow the instructions in the section "Master document configuration", of the "Master document management" procedure. |
When the master document is configured, click on "![]() Confirm addition".
Confirm addition".
After taking note of the Word document's name, close the software.
Obtaining the Location of a Master Document
| |
|
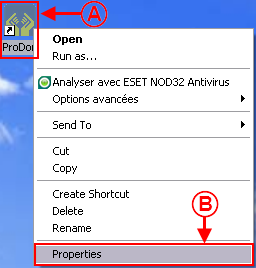
A: Right-click on the software shortcut that is on the desktop. |
B: In the menu, click on "Properties". |
|
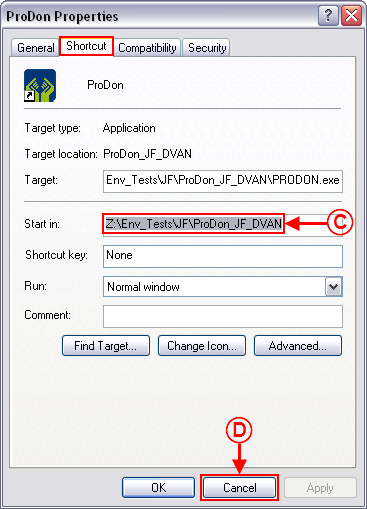
This window will open. | |
| |
|
C: Select and copy the path inscribed next to "Start in". |
D: After copying the path, click on the "Cancel" button. |
Saving a Word Document as Master Document
Open the Word document to save as master document.
"Save as" the document.
 | |
|
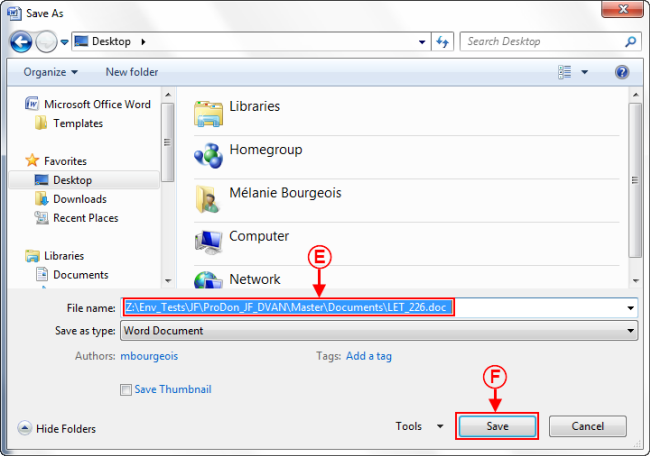
E: Paste the path copied earlier. Right after the path, type "\Master\Documents\", then add the file name the database attributed to the master document (the master document in the example is named LET_226). |
F: Click on "Save". |
|
CAUTION: Do not use extension ".docx" of Word (Word 2003 or older versions). | |
Close the Word document.
Opening the Master Document from the Software
Open the database.
Go in the "Master document management" by clicking on the "Mailings" menu, then click on "![]() Master documents".
Master documents".
| |
|
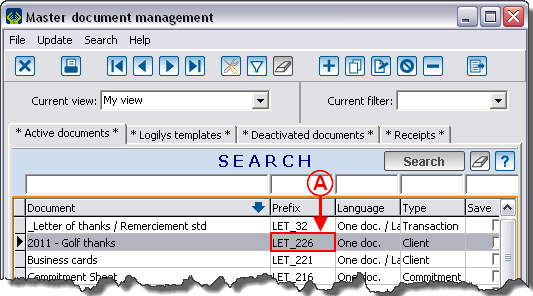
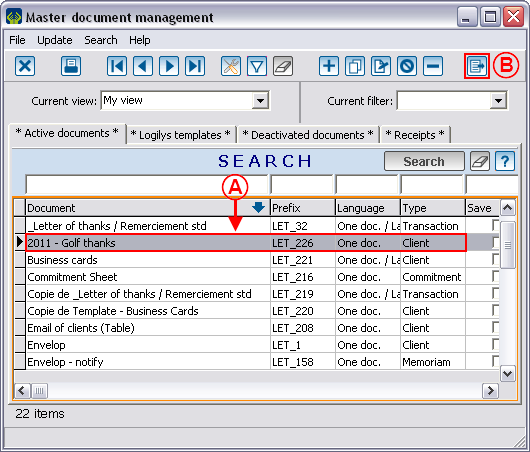
A: Select the master document created earlier. |
|
|
The integrated master document opens. |
|
|
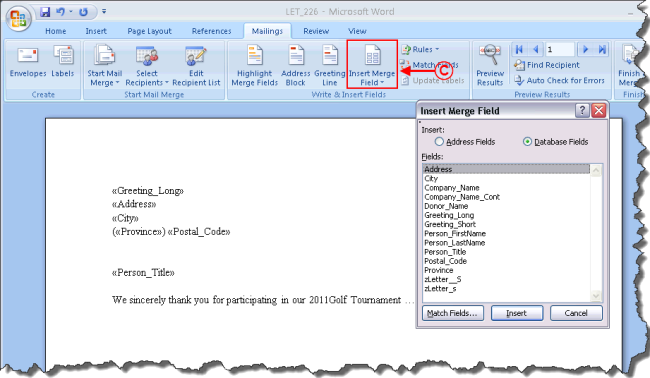
C: Insert the wanted merge fields. For more information concerning the insertion of merge fields, click here. |
When the fields are inserted and the document is complete, save it using the "Save" function. The database will always keep the same document name and the same location. NEVER USE THE "Save as" FUNCTION.
Document name: ProDon:Integrating a Word Document in the Database
Version : 4.6.5.7
