Difference between revisions of "ProDon:Cancelling a Transaction"
| (42 intermediate revisions by 2 users not shown) | |||
| Line 1: | Line 1: | ||
| − | {{ | + | {{Header_TOC}}<br> |
| − | == Introduction == | + | == Introduction == |
| + | It is sometimes necessary to delete or edit a transaction that has already been created in '''''ProDon'''''. | ||
| + | <br> | ||
| − | + | The reasons may vary, for instance: | |
| + | *The transaction is linked to the wrong donor; | ||
| + | *The transaction is linked to the wrong donation occasion / activity; | ||
| + | *The amount of the transaction is incorrect; | ||
| + | *The cheque received for the payment is a non-sufficient fund cheque; | ||
| + | *The transaction has been entered twice ... | ||
| + | <br> | ||
| − | + | If the transaction has not been transferred yet, any wanted modification can be made to the transaction without having any impact on the information in the database. | |
| + | |||
| + | <br> | ||
| + | |||
| + | If the transaction was transferred, but the receipt has not been issued yet, modifications can still be made. However, it is strongly '''not recommended''' to delete this transaction because you would lose track of it. It is therefore preferable to '''cancel the transaction''' and to create a new one. This way, track of the changes made will be kept in the database. | ||
| + | |||
| + | <br> | ||
| + | |||
| + | On the other hand, if the transaction was transferred and the receipt has already been issued; you first have to [[ProDon:Cancelling, Reissuing and Reprinting Receipts|cancel the receipt]] prior to proceeding with the cancellation of the transaction. | ||
| + | |||
| + | <br> | ||
| + | |||
| + | '''CAUTION: '''When a transaction is cancelled, you have to make sure that the information has been transmitted to the accounting software. | ||
| + | |||
| + | == Cancelling a Transaction == | ||
| + | |||
| + | To cancel a transaction, go to the "Client management". | ||
| + | |||
| + | {| cellspacing="1" cellpadding="1" border="1" class="wikitable" style="width: 400px; height: 394px;" | ||
|- | |- | ||
| | | | ||
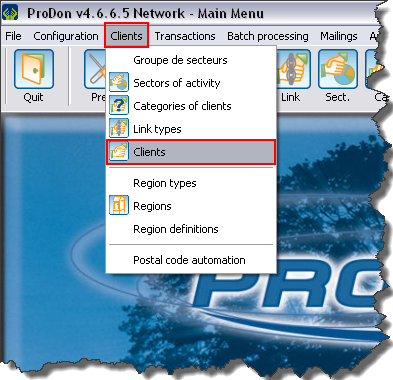
| + | To do so, from the software home page, click on the "Clients" menu, then select "[[Image:Bouton Client.png]] Clients" | ||
| + | |||
|- | |- | ||
| − | | | + | | [[Image:Cancelling Transaction 001.png]]<br> |
|} | |} | ||
| + | <br> | ||
| − | + | {| cellspacing="1" cellpadding="1" border="1" class="wikitable" style="width: 593px; height: 410px;" | |
| − | {| | ||
|- | |- | ||
| colspan="2" | | | colspan="2" | | ||
| + | After clicking on "[[Image:Bouton Client.png]] Clients", this window opens. | ||
| + | |||
|- | |- | ||
| − | | colspan="2" | | + | | colspan="2" | [[Image:Cancelling Transaction 002.png]]<br> |
|- | |- | ||
| width="50%" | | | width="50%" | | ||
| + | '''<span style="color: rgb(255, 0, 0);">A: </span>'''Search, using the [[Common functions:Search Bar|search bar]], the client for whom the transaction must be cancelled. | ||
| + | |||
| width="50%" | | | width="50%" | | ||
| + | '''<span style="color: rgb(255, 0, 0);">B: </span>'''Once the client is found, double-click on this client's line. | ||
| + | |||
|} | |} | ||
| − | + | <br> | |
{| width="50%" cellspacing="1" cellpadding="1" border="1" class="wikitable" | {| width="50%" cellspacing="1" cellpadding="1" border="1" class="wikitable" | ||
|- | |- | ||
| colspan="2" | | | colspan="2" | | ||
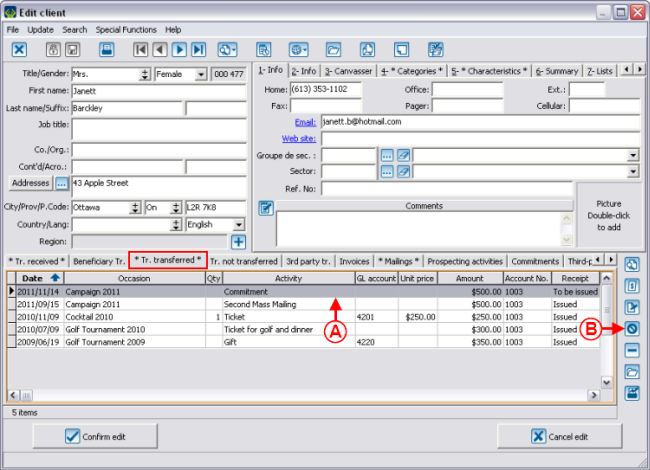
| + | After clicking on the client's line for whom a transaction must be cancelled, this client's file opens. Go to the "Tr. transferred" tab at the bottom of the file. | ||
| + | |||
|- | |- | ||
| − | | colspan="2" | | + | | colspan="2" | [[Image:Cancelling Transaction 003.png]]<br> |
|- | |- | ||
| width="50%" | | | width="50%" | | ||
| + | '''<span style="color: rgb(255, 0, 0);">A: </span>'''Select the line of the transaction to be cancelled. | ||
| + | |||
| width="50%" | | | width="50%" | | ||
| + | '''<span style="color: rgb(255, 0, 0);">B: </span>'''Click on the [[Image:Button cancel.png]] button. | ||
| + | |||
|} | |} | ||
| + | <br> | ||
| + | === Procedure if the receipt has already been issued === | ||
| − | + | {| cellspacing="1" cellpadding="1" border="1" style="width: 389px; height: 168px;" class="wikitable" | |
| − | |||
| − | {| | ||
|- | |- | ||
| | | | ||
| + | After clicking on the [[Image:Button cancel.png]] button, this window opens. | ||
| + | |||
|- | |- | ||
| − | | | + | | [[Image:Cancelling Transaction 004.png]] |
|} | |} | ||
| + | <br> | ||
| + | You then have to cancel the receipt. To learn how to cancel a receipt, consult the [[ProDon:Cancelling, Reissuing and Reprinting Receipts|"Cancelling, Reissuing and Reprinting Receipts"]] procedure. | ||
| + | <br> | ||
| + | === Procedure if the receipt was cancelled or has not been issued yet === | ||
| − | + | {| cellspacing="1" cellpadding="1" border="1" class="wikitable" style="width: 269px; height: 189px;" | |
| − | |||
| − | {| | ||
|- | |- | ||
| | | | ||
| + | After clicking on the [[Image:Button cancel.png]] button, this window opens. | ||
| + | |||
|- | |- | ||
| − | | | + | | [[Image:Cancelling Transaction 005.png]] |
|- | |- | ||
| | | | ||
| + | Click on the "[[Image:Button Check mark Confirm.png]] Yes" button. | ||
| + | |||
|} | |} | ||
| + | <br> | ||
| − | + | {| cellspacing="1" cellpadding="1" border="1" class="wikitable" style="width: 302px; height: 266px;" | |
| − | {| | ||
|- | |- | ||
| | | | ||
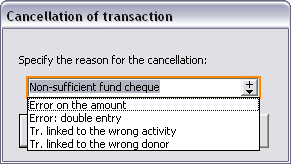
| + | After clicking on the "[[Image:Button Check mark Confirm.png]] Yes" button, this window opens. | ||
| + | |||
|- | |- | ||
| − | | | + | | [[Image:Cancelling Transaction 006.png]] |
|- | |- | ||
| | | | ||
| + | Choose, using the drop-down list, the reason for the cancellation. If none of the reasons available can be applied to the situation, it is possible to add a new one by manually entering the information in the box. In this example, the reason "Non-sufficient fund cheque" was added. | ||
| + | |||
|} | |} | ||
| + | <br> | ||
| − | + | {| cellspacing="1" cellpadding="1" border="1" class="wikitable" style="width: 302px; height: 228px;" | |
| − | {| | ||
|- | |- | ||
| | | | ||
| + | If a new reason was added to the list at the previous step, this window opens. | ||
| + | |||
|- | |- | ||
| − | | | + | | [[Image:Cancelling Transaction 007.png]] |
|- | |- | ||
| | | | ||
| + | To confim the addition of the cancellation reason to the drop-down list, click on the "[[Image:Button Check mark Confirm.png]] Yes" button. | ||
| + | |||
|} | |} | ||
| + | <br> | ||
| − | + | {| cellspacing="1" cellpadding="1" border="1" class="wikitable" style="width: 302px; height: 229px;" | |
| − | {| | ||
|- | |- | ||
| | | | ||
| + | After clicking on the "[[Image:Button Check mark Confirm.png]] Yes" button, the software goes back to the previous window. | ||
| + | |||
|- | |- | ||
| − | | | + | | [[Image:Cancelling Transaction 008.png]] |
|- | |- | ||
| | | | ||
| + | Click on "[[Image:Button Check mark Confirm.png]] OK" to confirm the cancellation reason. | ||
| + | |||
|} | |} | ||
| + | <br> | ||
| − | + | {| width="650" cellspacing="1" cellpadding="1" border="1" class="wikitable" | |
| − | {| width=" | ||
|- | |- | ||
| − | | | + | | [[Image:Cancelling Transaction 009.png]]<br> |
|- | |- | ||
| | | | ||
| + | After confirming the cancellation reason, the cancelled transaction is still present in the client file, but a line over the transaction indicates that it has been cancelled. | ||
| + | |||
|} | |} | ||
| + | == Reactivating a Cancelled Transaction == | ||
| + | After cancelling a transaction, it is possible to reactivate it. This option is available in the event that a transaction was cancelled by mistake. | ||
| − | + | '''CAUTION: '''Do not use the reactivation of cancelled transactions when receiving the second payment, since tracks of the bad payment will be lost. To enter a subsequent payment, enter a new transaction. | |
| − | |||
| + | <br> | ||
{| width="50%" cellspacing="1" cellpadding="1" border="1" class="wikitable" | {| width="50%" cellspacing="1" cellpadding="1" border="1" class="wikitable" | ||
|- | |- | ||
| − | | colspan="2" | | + | | colspan="2" | [[Image:Cancelling Transaction 010.png]]<br> |
|- | |- | ||
| width="50%" | | | width="50%" | | ||
| + | '''<span style="color: rgb(255, 0, 0);">A: </span>'''Select the line of the transaction to reactivate. | ||
| + | |||
| width="50%" | | | width="50%" | | ||
| + | '''<span style="color: rgb(255, 0, 0);">B: </span>'''Click on the [[Image:Button cancel.png]] button. | ||
| + | |||
|} | |} | ||
| + | <br> | ||
| − | + | {| cellspacing="1" cellpadding="1" border="1" style="width: 290px; height: 244px;" class="wikitable" | |
| − | {| | ||
|- | |- | ||
| | | | ||
| + | After clicking on the [[Image:Button cancel.png]] button, this window opens. | ||
| + | |||
|- | |- | ||
| − | | | + | | [[Image:Cancelling Transaction 011.png]] |
|- | |- | ||
| | | | ||
| + | Click on the "[[Image:Button Check mark Confirm.png]] Yes" button to reactivate the transaction. | ||
| + | |||
|} | |} | ||
| − | + | <br> | |
{| width="50%" cellspacing="1" cellpadding="1" border="1" class="wikitable" | {| width="50%" cellspacing="1" cellpadding="1" border="1" class="wikitable" | ||
|- | |- | ||
| − | | | + | | [[Image:Cancelling Transaction 012.png]] |
|- | |- | ||
| | | | ||
| + | After confirming the reactivation, the transaction becomes active again and the line over it disappears. | ||
| + | |||
|} | |} | ||
| + | == Impact on the Reports == | ||
| + | Cancelling a transaction that was transferred has an impact on the information of the database. | ||
| − | + | Among others, all the reports that were printed when transferring the batch will be wrong, as well as the information that was sent to accounting. The reports will therefore have to be reproduced. | |
| − | |||
| + | === Reprinting Different Reports === | ||
| − | + | It is possible to reprint the different batch reports from the file of the client for whom a transaction was cancelled. | |
| − | |||
| + | <br> | ||
{| width="50%" cellspacing="1" cellpadding="1" border="1" class="wikitable" | {| width="50%" cellspacing="1" cellpadding="1" border="1" class="wikitable" | ||
|- | |- | ||
| − | | colspan="2" | | + | | colspan="2" | [[Image:Cancelling Transaction 013.png]] |
|- | |- | ||
| width="50%" | | | width="50%" | | ||
| + | '''<span style="color: rgb(255, 0, 0);">A: </span>'''Click on the line of the cancelled transaction. | ||
| + | |||
| width="50%" | | | width="50%" | | ||
| + | '''<span style="color: rgb(255, 0, 0);">B: </span>'''Click on the [[Image:Button reprint batch.png]] button. | ||
| + | |||
|} | |} | ||
| − | + | <br> | |
{| width="50%" cellspacing="1" cellpadding="1" border="1" class="wikitable" | {| width="50%" cellspacing="1" cellpadding="1" border="1" class="wikitable" | ||
|- | |- | ||
| | | | ||
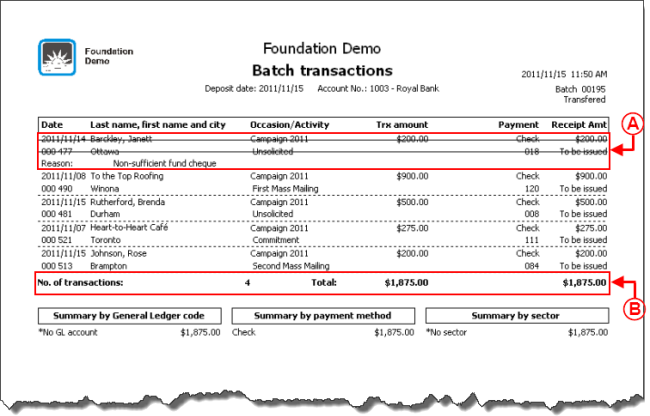
| + | After clicking on "[[Image:Button Check mark Confirm.png]] Continue", the report is printed or is displayed onscreen, according to the options checked in the previous window. | ||
| + | |||
| + | |- | ||
| + | | [[Image:Cancelling Transaction 015.png]] | ||
|- | |- | ||
| | | | ||
| + | '''<span style="color: rgb(255, 0, 0);">A: </span>'''On the report, the cancelled transaction is present, as well as the reason for its cancellation. | ||
| + | |||
|- | |- | ||
| | | | ||
| + | '''<span style="color: rgb(255, 0, 0);">B: </span>'''The totals were corrected as well. | ||
| + | |||
|} | |} | ||
| + | <br> | ||
| − | + | {{Footer_ProDon_Version|4.6.6.5}}<br> | |
| − | {| | ||
| − | |||
| − | |||
| − | |||
| − | |||
| − | |||
| − | |||
| − | |||
| − | |||
| − | |||
Latest revision as of 08:37, 5 May 2016
| Cancelling a Transaction |
Introduction
It is sometimes necessary to delete or edit a transaction that has already been created in ProDon.
The reasons may vary, for instance:
- The transaction is linked to the wrong donor;
- The transaction is linked to the wrong donation occasion / activity;
- The amount of the transaction is incorrect;
- The cheque received for the payment is a non-sufficient fund cheque;
- The transaction has been entered twice ...
If the transaction has not been transferred yet, any wanted modification can be made to the transaction without having any impact on the information in the database.
If the transaction was transferred, but the receipt has not been issued yet, modifications can still be made. However, it is strongly not recommended to delete this transaction because you would lose track of it. It is therefore preferable to cancel the transaction and to create a new one. This way, track of the changes made will be kept in the database.
On the other hand, if the transaction was transferred and the receipt has already been issued; you first have to cancel the receipt prior to proceeding with the cancellation of the transaction.
CAUTION: When a transaction is cancelled, you have to make sure that the information has been transmitted to the accounting software.
Cancelling a Transaction
To cancel a transaction, go to the "Client management".
|
To do so, from the software home page, click on the "Clients" menu, then select " |
 |
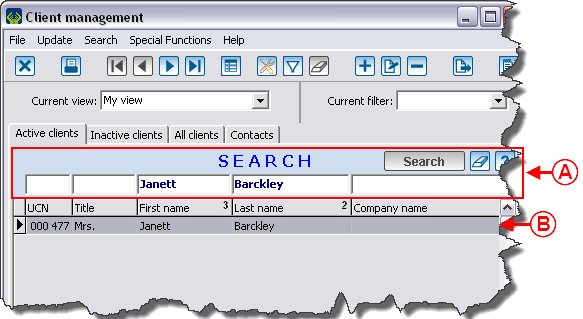 | |
|
A: Search, using the search bar, the client for whom the transaction must be cancelled. |
B: Once the client is found, double-click on this client's line. |
Procedure if the receipt has already been issued

|
You then have to cancel the receipt. To learn how to cancel a receipt, consult the "Cancelling, Reissuing and Reprinting Receipts" procedure.
Procedure if the receipt was cancelled or has not been issued yet
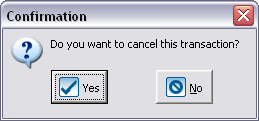
|
|
If a new reason was added to the list at the previous step, this window opens. |

|
|
To confim the addition of the cancellation reason to the drop-down list, click on the " |
|
After clicking on the " |
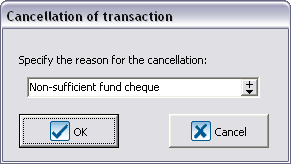
|
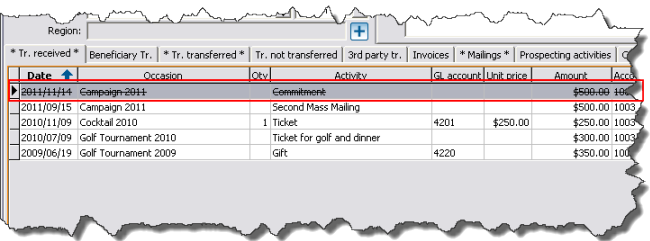 |
|
After confirming the cancellation reason, the cancelled transaction is still present in the client file, but a line over the transaction indicates that it has been cancelled. |
Reactivating a Cancelled Transaction
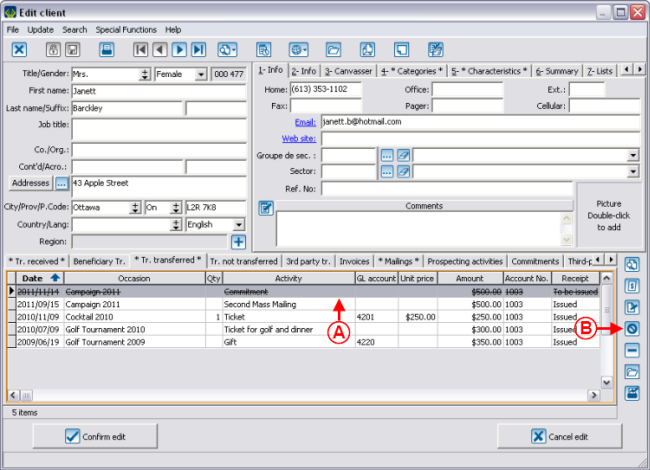
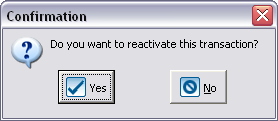
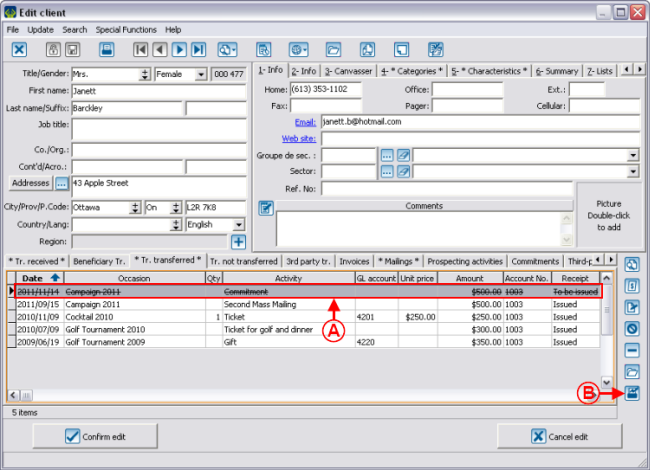
After cancelling a transaction, it is possible to reactivate it. This option is available in the event that a transaction was cancelled by mistake.
CAUTION: Do not use the reactivation of cancelled transactions when receiving the second payment, since tracks of the bad payment will be lost. To enter a subsequent payment, enter a new transaction.
 | |
|
A: Select the line of the transaction to reactivate. |
|
|

|
|
After confirming the reactivation, the transaction becomes active again and the line over it disappears. |
Impact on the Reports
Cancelling a transaction that was transferred has an impact on the information of the database.
Among others, all the reports that were printed when transferring the batch will be wrong, as well as the information that was sent to accounting. The reports will therefore have to be reproduced.
Reprinting Different Reports
It is possible to reprint the different batch reports from the file of the client for whom a transaction was cancelled.
| |
|
A: Click on the line of the cancelled transaction. |
|
Document name: ProDon:Cancelling a Transaction
Version : 4.6.6.5
