Difference between revisions of "ProDon:Mass Mailing"
| Line 1: | Line 1: | ||
| − | {{ | + | {{Header_ProDon_TOC}}<br> |
<br> | <br> | ||
| Line 45: | Line 45: | ||
=== "Selection" Tab === | === "Selection" Tab === | ||
| − | {| | + | {| cellspacing="1" cellpadding="1" border="1" style="width: 474px; height: 741px;" class="wikitable" |
|- | |- | ||
| colspan="2" | | | colspan="2" | | ||
| Line 51: | Line 51: | ||
|- | |- | ||
| − | | style="text-align: center; | + | | colspan="2" style="text-align: center;" | [[Image:Mass Mailing 001.png]]<br> |
|- | |- | ||
| width="50%" | | | width="50%" | | ||
| Line 77: | Line 77: | ||
=== "Grouping" Tab === | === "Grouping" Tab === | ||
| − | {| | + | {| cellspacing="1" cellpadding="1" border="1" class="wikitable" style="width: 464px; height: 356px;" |
|- | |- | ||
| | | | ||
| Line 94: | Line 94: | ||
=== "Mailings" Tab === | === "Mailings" Tab === | ||
| − | {| | + | {| cellspacing="1" cellpadding="1" border="1" style="width: 471px; height: 863px;" class="wikitable" |
|- | |- | ||
| − | | | + | | style="text-align: center;" colspan="2" | [[Image:Mass Mailing 003.png]] |
|- | |- | ||
| width="50%" | | | width="50%" | | ||
| Line 131: | Line 131: | ||
=== "Standard documents" and "Documents to be saved" Tab === | === "Standard documents" and "Documents to be saved" Tab === | ||
| − | {| | + | {| cellspacing="1" cellpadding="1" border="1" class="wikitable" style="width: 462px; height: 465px;" |
|- | |- | ||
| − | | style="text-align: center; | + | | colspan="2" style="text-align: center;" | [[Image:Mass Mailing 004.png]] |
|- | |- | ||
| width="50%" | | | width="50%" | | ||
| Line 218: | Line 218: | ||
<br> | <br> | ||
| − | {| | + | {| cellspacing="1" cellpadding="1" border="1" style="width: 460px; height: 387px;" class="wikitable" |
|- | |- | ||
| style="text-align: center;" | [[Image:Mass Mailing 005.png]] | | style="text-align: center;" | [[Image:Mass Mailing 005.png]] | ||
| Line 229: | Line 229: | ||
<br> | <br> | ||
| − | {| | + | {| cellspacing="1" cellpadding="1" border="1" style="width: 364px; height: 573px;" class="wikitable" |
|- | |- | ||
| − | | | + | | style="text-align: center;" colspan="2" | [[Image:Mass Mailing 006.png]] |
|- | |- | ||
| width="50%" | | | width="50%" | | ||
| Line 254: | Line 254: | ||
<br> | <br> | ||
| − | {| | + | {| cellspacing="1" cellpadding="1" border="1" style="width: 519px; height: 469px;" class="wikitable" |
|- | |- | ||
| − | | | + | | style="text-align: left;" colspan="2" | |
This window opens after selecting the option "Take the first contact with the specified link" in <span style="color: rgb(255, 0, 0);">'''D'''</span>. | This window opens after selecting the option "Take the first contact with the specified link" in <span style="color: rgb(255, 0, 0);">'''D'''</span>. | ||
| Line 272: | Line 272: | ||
<br> | <br> | ||
| − | {| | + | {| cellspacing="1" cellpadding="1" border="1" style="width: 467px; height: 838px;" class="wikitable" |
|- | |- | ||
| − | | | + | | style="text-align: center;" colspan="2" | [[Image:Mass Mailing 008.png]] |
|- | |- | ||
| width="50%" | | | width="50%" | | ||
| Line 305: | Line 305: | ||
<br> | <br> | ||
| − | {{ | + | {{Footer_ProDon_Version|4.6.5.6}}<br> |
Revision as of 12:26, 23 February 2016
Contents
[hide]Introduction
Mass mailing consists in producing, in a massive and customized manner, a document intended for several clients at the same time. There are five types of mass mailing: Client ![]() ; Transaction
; Transaction ![]() ; Commitment
; Commitment ![]() ; In Memoriam Gifts
; In Memoriam Gifts ![]() and Contact
and Contact ![]() .
.
Creating a Master Document
Prior to performing a mass mailing, you first need to create the master document; then prepare the list of people for whom the document must be customized.
CAUTION: A master document is not available in all the software managements. The type of the chosen master document determines the location where it is available in the system.
For more information concerning the creation of a master document, consult this procedure.
When the master document is complete, close the "Master document management".
Preparing the Active List
To perform a mass mailing, you need to prepare the list of people for whom the document is addressed. To do so, go to the management associated with the type of merge document; for example, the "Client management".
There are three search methods to get a list of people in accordance with precise criteria:
Search from the search bar;
Search from a filter;
Search from a customized list.
When the list of people is ready and active onscreen, start mass mailing.
Client Mass Mailing
This type of mass mailing allows you to create documents such as a solicitation letter, event announcement, etc.
After preparing the active list, click on the "![]() Client mass mailing" button, which is at the top of the management window. Then, if need be, select the option "Client mass mailing" (This option is required only in the "Client management", where the contact type mass mailing is also available.).
Client mass mailing" button, which is at the top of the management window. Then, if need be, select the option "Client mass mailing" (This option is required only in the "Client management", where the contact type mass mailing is also available.).
"Selection" Tab
 | |
|
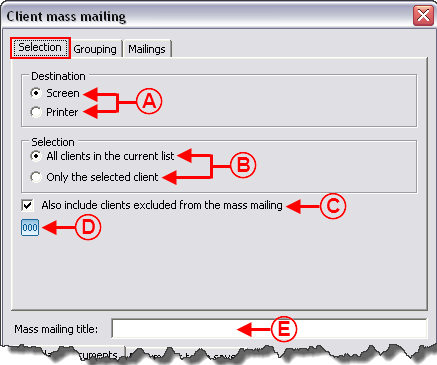
A: Allows you to choose whether the document will be generated onscreen or printed directly. |
B: Allows you to determine whether the mass mailing will be sent to all the clients of the active list or to the selected client only. |
|
C: Includes the clients excluded from mass mailing. |
D: By clicking on this button, a sentence indicates the number of clients excluded from mass mailing and the total number of people to whom the mass mailing will be done. |
|
E: To include a title in the document, enter the desired title. CAUTION: In order for the title to be active, you must activate the "Title_Mass_Mailing" merge field in the master document configuration. |
|
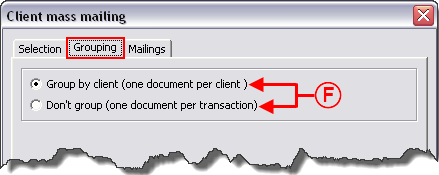
"Grouping" Tab
"Mailings" Tab
| |
|
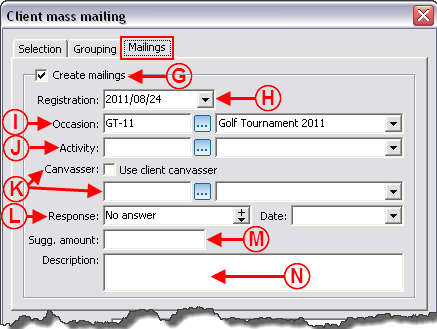
G: This option allows you to create a mailing history in the "Mailings" tab of each client file present in the active list (In this example, the software remembers that a solicitation letter for the "Golf Tournament 2011" was sent on August 24, 2011). For more information concerning "Mailing history", consult this procedure. |
H: The current date is automatically entered, but it is possible to change it. |
|
I: Allows you to choose the occasion for which the mailing must be documented. |
J: Allows you to choose the activity for which the mailing must be documented. |
|
K: If the "Canvasser" box is checked, the default canvasser in the file is entered. By clicking on the |
L: Allows you to indicate the response to be entered in the "Mailings" tab of each client file; for example, "No answer" in the mass mailing production. Default responses can be configured in the software preferences; for example, "Gift received" when entering a transaction. For more information concerning the history configuration of the "Mailing history", click here. |
|
M: Allows you to suggest a donation amount. |
N: Allows you to enter a description to the mailing. |
"Standard documents" and "Documents to be saved" Tab
| |
|
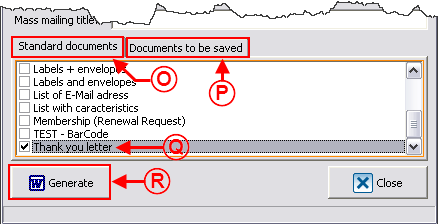
O: The "Standard documents" tab contains the client type master documents. |
P: The "Documents to be saved" tab contains the master documents that were configured to be saved in the clients' file (see letters B and E of the "Main screen" section of the "Master document management" document). |
|
Q: Select the master document to be merged (By selecting the master document, the "Generate" button becomes available.). |
R: When the mass mailing configuration is completed, click on "Generate". |
Transaction Mass Mailing
This type of mass mailing allows you to produce documents such as a thank you letter, a custom report including transactional data, etc.
After preparing the active list, click on the "![]() Transaction mass mailing" button, that is at the top of the management window.
Transaction mass mailing" button, that is at the top of the management window.
The transaction mass mailing options are the same as the ones of the client mass mailing. Of course, the "Grouping" tab is not accessible since the mass mailing is of transaction type.
Moreover, the "Standard documents" and "Documents to be saved" tabs contain the transaction master documents instead of the client master documents.
To perform a transaction mass mailing, follow the "Client mass mailing" procedure for the "Selection" and "Mailings" tabs.
Commitment Mass Mailing
This type of mass mailing is available only if the "Prospecting and Commitments" module is active in the software. It allows you to produce documents such as a thank you letter, a custom report including data relating to a commitment, etc.
After preparing the active list, click on the "![]() Commitment mass mailing" button that is at the top of the management window.
Commitment mass mailing" button that is at the top of the management window.
The commitment mass mailing options are the same as the ones of the client mass mailing. Of course, the "Grouping" tab is not accessible since it is a "Commitment" mass mailing.
Furthermore, the "Standard documents" and "Documents to be saved" tabs contain the commitment master documents instead of the client master documents.
To perform the commitment mass mailing, follow the "Client mass mailing" procedure for the "Selection" and "Mailings" tabs.
In Memoriam Gifts Mass Mailing
This type of mass mailing allows you to produce documents related to "In Memoriam gifts", such as a thank you letter to the donor, a report containing all the donations as well as the donors' names to be given to the family to notify, etc.
To perform an "In Memoriam gift mass mailing", see this procedure.
Contact Mass Mailing
This type of mass mailing allows you to produce the same type of documents as in the "Client mass mailing"; for example, a letter of solicitation, event announcement, etc. However, the mailing can be addressed to the "Internal contacts" or to the "Link/contacts" of the client file and not only to the main client of the file.
NOTE: The "Internal contacts" and the "Link/contacts" are visible in the "Contacts" tab at the bottom of a client file (not to be confused with the "Links" tab).
The "Contact mass mailing" is only accessible from the four tabs of the "Client management" and is configured differently depending on the tab from which the active list is prepared.
After preparing the active list from the appropriate tab of the "Client management", click on the "![]() Client mass mailing" button, then select the "Contact mass mailing" option.
Client mass mailing" button, then select the "Contact mass mailing" option.
The options of the "Contact mass mailing" are the same as the ones of the "Client mass mailing". However, the "Selection order of contacts" tab is added to the "Selection" and "Mailings" tabs. Of course, the "Grouping" tab is not accessible since the mass mailing is of contact type.
If the mass mailing is done from the tabs "Active clients", "Inactive clients" and "All clients" of the "Client management". The "Selection order of contacts" tab of the "Contact mass mailing" window is configured differently from a mass mailing done from the "Contacts" tab of the "Client management".
Moreover, the "Standard documents" and "Documents to be saved" tabs that are at the bottom of the "Contact mass mailing" window contain the master documents of contact type instead of master documents of client type.
"Selection order of contacts" Tab
From theTabs "Active clients", "Inactive clients" and "All clients" of the "Client management"
To perform the "Contact mass mailing" when the active list is produced from the tabs "Active clients", "Inactive clients" and "All clients" of the "Client management", follow the "Client mass mailing" procedure for the "Selection" and "Mailings" tabs. Here is the procedure for the "Selection order of contacts" tab.
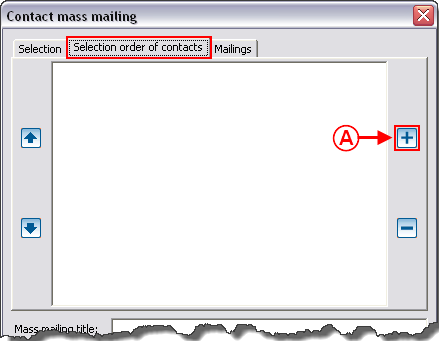
|
|
A: Click on the |
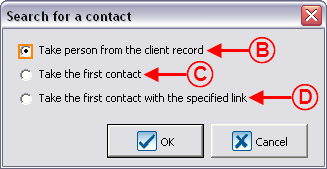
| |
|
B: To activate this option, you simply need to select it and click on " |
C: To activate this option, you simply need to select it and click on " |
|
D: To activate this option, you simply need to select it and click on " |
NOTE: More than one option can be activated, but only one at a time can be selected. That is: click on the |
CAUTION: If more than one option are activated, you have to manage the priorities (see letter J).
|
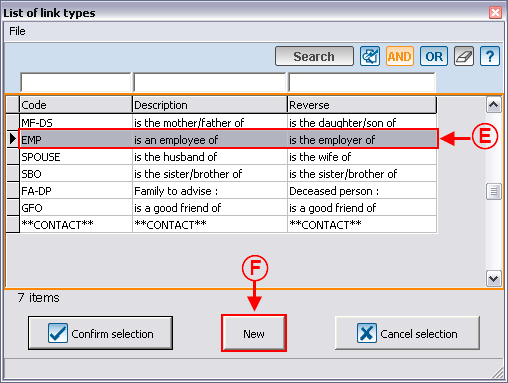
This window opens after selecting the option "Take the first contact with the specified link" in D. | |
| |
|
E: Select the wanted "Link/contact", then click on |
F: To enter a link that is not in the list, click on "New". |
| |
|
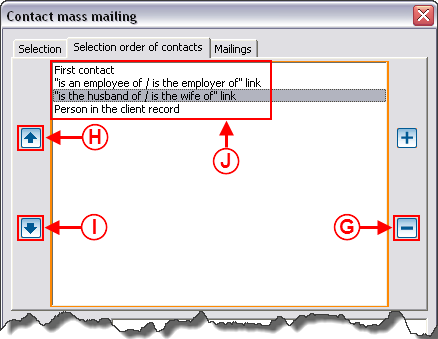
G: Allows you to remove a selection. To do so, select what must be removed, then click on the |
H: Allows you to modify the order of priority. To do so, select what should be first, then click on the |
|
I: Allows you to modify the priority order. To do so, select what should be less of a priority, then click on the |
J: It is the "Selection order of contacts". In this example, the mass mailing will first be sent to the first contact of the client file. If there is no first contact in the client file, the mass mailing will be sent to the first "Link/contact" with the link ""is an employee of / is the employer of" link" of the client file. If there is no first contact nor a ""is the employee of / is the employer of" link" in the client file, the mass mailing will be sent to the individual's spouse of the client file, and so on. |
|
NOTE: If no selection criterion is present in the client file, the mass mailing will automatically be sent to the main individual of the client file. | |
From the "Contacts" Tab of the "Client management"
To perform a "Contact mass mailing" when the active list is created from the "Contacts" tab of the "Client management", follow the "Client mass mailing" procedure for the "Selection" and "Mailings" tabs. Contrary to the three other tabs of the "Client management", the "Selection order of contacts" tab will no longer be modifiable since an active list generated from the "Contacts" tab contains contacts instead of clients. Therefore, it is not necessary to add selection criteria of contacts since they were chosen in the creation of the active list.
Document name: ProDon:Mass Mailing
Version : 4.6.5.6
